Showing posts with label image editing tools. Show all posts

Wednesday, August 3, 2011

Picnik – awesome photo editing tool

Picnik is a great photo editing tool. It allows its users to apply several awesome effects on their images using a wide range of editing tools. “ It’s fast, easy, and offers tons of powerful tools, artistic effects, stickers, frames, touch-ups, scrapbooking tools and more. And that’s all for free.”
Picnik is one of the best photo editing tools online. It has two versions: one is free and has enough features to let us tweak images the way we want and the other is premium and has extra features, more tools, advanced effects.


I highly recommend this web tool to educators. Just head over to Picnik and open your free account and start tweaking pictures to share with your students in the classroom. If you want to be an advanced Picnik user then here is a detailed guide to walk you through the different steps and tricks behind a full mastery of Picnik details. Read The Complete Guide of How to Perfectly Use Picnik.

Some features of Picnik

Here is a list of the main features that Picnik offers to its users:
  • It is both free and paid
  • It has a user friendly interface
  • It is easy to use
  • It allows users to customize and tweak their images in the ways they want
  • It lest you crop, resize, and rotate in real-time
  • It works on Mac, Windows, and Linux

How can i get started using Picnik ?

Here is a short video tutorial to show you how to use Picnik


If you liked this application and want to discover other similar tools then i advise you to check: Free Photo Editing Tools.

Tuesday, August 2, 2011

GrossOut – use scary effects to customize your picture

GrossOut is a cool web application. It is a photo editing tool  that is not like any other  app we have covered here so far. GrossOut enables its users to turn their pictures into gross shots. Before , i used to introduce you to photo tools that only allow you to add embellishing  effects but today you will step into the world of ugly art. You will be adding heinous and scary effects such as “crazy eyes, gnawing teeth, eye patches, bat wings, bloody knives and axes, open gash and wounds, masks, and many many more.”

image

Some features of GrossOut

Here is a list of the main features that GrossOut offers to its users:
  • It is free
  • It is easy to use
  • It does not require any sign up or registration
  • It lets you add scary and heinous effects to your images
  • You can upload your own picture or capture one using your webcam
  • You can also download your scary photo to your computer

grossout

How can i get started using GrossOut ?

It is very simple. Just head over to GrossOut main page and start uploading your image or use your camera to capture one. When the upload is over you will be then directed to the editor where you can have access to several  gross tools to apply on your photo. You can also flip, resize, and rotate each item for maximum effect.

YourOldPIC – make your pictures look old

YourOldPic is a great image editing tool. It allows its users to make their pictures look old. In fact this option exists in many other applications but it is not as simple and effective as in this website. You do not need any technological knowledge to do it. It is very simple and in a couple of seconds you will have a  picture that you have taken just this morning looks like one being taken decades ago.

youroldpic


YourOldPic allows you to upload your own pictures . Right after the upload is over, you can then see your picture in the old form. The new customized picture can be easily shared via the networking buttons located under it.

Some features of YourOldPic

Here is a lis of the main features that YourOldPic offers to its users:
  • It is free
  • It is easy to use
  • It has an intuitive interface
  • It allows its users to make their pictures look old
  • You can upload your pictures there
  • You can share them with your friends and everyone else via email
  • You can also bookmark your photo
  • you can use the embeddable code to use the picture in your blog or website

How can i get started using YourOldPIC ?

It is very simple. You just need to head over to YourOldPic main page. Upload your picture and wait for a few seconds then you will be provided with the ‘old’ form of the picture. You can use the networking buttons under it to share it with other people

Monday, August 1, 2011

iPiccy – add cartonizing effects to your pictures

iPiccy is another great photo editing web site. It allows its users to add wonderful effects to their images. What is great about this tool is that it does not require any installation or download. Whenever you are connected you can just head over to its main page and start editing right from there.
iPiccy offers a plethora of editing functions that you can use very easily . Among these editing  services are resizing, cropping, rotation, contrast fixing, and equalizing.. You can also use their cartonizing tools to turn your pictures into cartoons, a service which i like the most.


iPiccy lets you upload your own pictures from your computer or  select an image that is stored online. In case you do not have any , you can take one with your webcam or use the paint tools to draw yours.

Some features of iPiccy

Here is  a set of the main features that iPiccy offers to its users:
  • It is free
  • It is easy to use
  • It allows its users to add awesome effects to their pictures
  • You can upload pictures from your pc or URL or simply draw one you like
  • It provides several image editing tools
  • you can share your customized picture with a direct URL.

Applications of iPiccy in education

If you are an educator then i would recommend this tool for you. Use it to create awesome customized pictures to share with your students. If yopu need more photo editing tools that are as easy to work on as this one mentioned here then i invite you to check Free Photo Editing Tools.

Pixlr-o-matic – add awesome effects to your images


Pixlr-o-matic is a great photo editing tool. It allows its users to customize their pictures the way they want using very simple tools. we all sometimes want to add a personal touch to the pictures we would like to share with others especially when it comes to using them in the classroom. Pixlr-o-matic is one of the easiest tools to help you add that personal touch without being a techno geek.


Some featres of Pixlr-o-matic

Here is a list of the main features that Pixlr-o-matic offers to its users:
  • It is easy to use
  • It has a user friendly interface
  • It lets you customize your pictures the way you want
  • It allows you to add awesome retro looks to images
  • You can upload images from your pc or webcam
  • No sign up is needed

Applications of Pixlr-o-matic in education

i do recommend this website to educators. They can use it to add amazing effects to the pictures they want to use in the classroom. Students will love to see customized images especially when they arouse their curiosity and interactivity.
If you want to learn more about other great photo editing tools then i invite you to check Free Image Editing Tools.

RoundPic – add rounded corners to your images

RoundPic is a cool website. It allows its users to edit their images and turn them into rounded pictures. I know many of you use different photo editing tools but this applications is one of the easiest ones available online. It is very simple and instant and the result is great.
Photos are a very important elements in the teaching and learning operation. We use them almost on a daily basis and having such easy tools at hand can only make your job greater.


Some features of RoundPic

Here is a list of the main features that RoundPic offers to its users:
  • It is free
  • It is easy to use
  • It has an intuitive interface
  • It lets users edit their images
  • It lets you make rounded corners for images
  • It lets you upload a picture from the web or hard drive
  • It supports different formats such as JPEG, .JPG, GIF, .BMP or .PNG.
  • You can save rounded images to your pc
  • It does not require any email or registration

How can i get satrted using RoundPic

It is very simple. Just head over to RoundPic main page . Upload a picture from your pc or from a given URL and click “Round It”. When it is done you can then customize it the way you want. You can for instance customize the look of its corners and its size or change the background color.
If you want to learn more about other great photo editing tools then i invite you to check Free Image Editing Tools.

Monday, July 25, 2011

Thinglink- Embed Links, add sound and tag people in images

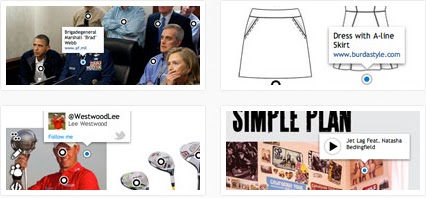
Thinglink is a great web tool. It provides a variety of image interaction tools to let its users to manipulate their images the way the like. It actually turns any image into a platform where you can add sound , tag things on it like items, people and faces, and embed links. When you finish customizing your image you can then share it with others via email or embed it on your blog or website.
Thinglink technology lets businesses and consumers connect their images to anywhere on the Internet. 90+ billion photos online offer rich opportunities for in-image links to engaging user experiences that will transform how we interact with images.


Some features of Thinglink

Here is a list of the main features that Thinglink offers to its users:
  • It is free

  • It has a user friendly interface

  • It is simple and easy to use

  • It lets you  embed links, sounds and tag items (thing, people etc) on your images.

  • It works both on mobile and tablets.

  • It is reliable and safe

  • It has a powerful tag editor

  • It supports several blogging platforms

  • Make your images public and let others tag them

  • You can sign in using facebook account .

  • you can automatically share with others via the social sharing buttons on the image

How can i get started using Thinglink ?

Here is a video tutorial to show you how you can use Thinglink


If you liked this post and want to explore other image editing tools then i invite you to read Free Image Editing Tools.

Saturday, June 18, 2011

Zoom.it - see all the details of an image

Zoom.it is a great photo tool. It allows its users to view and share high resolution imagery. It creates a display of your images in such a way that you can zoom in, zoom out and scroll around any image to see all its beautiful details and explore the whole image no matter how large it is. Zoom.it uses the Deep Zoom technology to give its users a new way to experience their imagery.


Some features of Zoom.it

here are the main features that Zoom.it provides for its users:
  • It is free
  • It is easy to use
  • It is simple
  • It allows you to display large images in blogs, wikis, and websites
  • It offers zooming and scrolling options
  • Images need to be  hosted online
  • It lets you share your images with other people using a direct link
  • You can also embed your images in blogs and wikis

How can i get started using Zoom.it ?

It is really very easy to handle. Jut head over to Zoom.it main page and paste the URL of the image you want to zoom and hit create.


It will take a few seconds for the application to start and when it is displayed then you can choose from the options available on the dashboard what action to take
If you want to share it click on the link Zoom.it generates for you and send it your friends and colleagues.
That’s it about Zoom.it –-see all the details of an image.

Monday, June 13, 2011

Image Embellisher – Easily Apply Special Effects to your Images

Image Embellisher is a great web 2.0 tool . It allows its users to quickly and easily add special effects to their images. This tool is very simple to use and is completely free. I know there are plenty of image editing tools out there but for us in education we always look for the best and simplest ones.


Some features of Image Embellisher

Here are the main features that Image Embellisher offers to its users:
  • It is free
  • It does not require any registration
  • It is simple to use
  • It allows you to apply special effects to images
  • You do not need to install any special software on your computer
  • You can run it on Windows, Linux, Mac and other systems
  • You can download the final version of your image to your computer

How can i get started using Image Embellisher ?

As i said before Image Embellisher is very easy to use and it takes only few clicks to create beautiful images. here is how to do it:
1 Pick the image effect
There are several image effects there for you to pick from


2 select your image
use the browse button , you can customize and resize your image
3 click on submit
a new image will be automatically generated for you.
4 Download
Now after you are done with your image you can download it to your computer.

Applications of Image Embellisher in Education

Image Embellisher is a great tool for educators. They can use it to generate beautiful pictures to include in their multimedia presentations. I love the freedom this tool offers to its readers, invite students to try it and you will see how creative they are in doing amazing staff with Image Embellisher.
That’s it about Image Embellisher – Easily Apply Special Effects to your Images.

Monday, May 2, 2011

Host-d.oddcast : Cartonize your Pictures into 3d Avatar

Host-d.oddcast is a great image editing tool . It allows its users to embed their pictures and cartonize them into 3d avatar . I find it similar if not better than Convert to Cartoon , the image tool i have covered in an earlier post entitled Convert to Cartoon : Turn your Pictures into Cartoons . I am one of the biggest fans of these tools as they are very helpful in teaching and students seem to show more interest and interaction when cartoons or avatars are included in a part of a  lesson.


Some features of Host-d.oddcast

Here are the main features that Host-d.oddcast offers to its users :
  • It is free
  • It does not require any sign up
  • It has a user friendly interface
  • It is dead simple and easy to use
  • You can upload your photos from your hard desk or use your webcam to get one
  • You can use the photos they provide if you do not want to use yours
  • You can use different smiles to your picture
  • You can customize your picture with hair , hats, facial art , and costumes
  • You can caricature your face ,add fish eye or brow lift
  • You can add a prerecorded audio and record yours to use with your picture
  • You can change race and gender of your photo
  • You can even change age and weight of your characters in your photo
  • You can share your image using email or download it . You can also post it facebook , or get the embed code to use in your wiki , blog or website.

How can i get started using Host-d.oddcast ?

Head over to Host-d.oddcast  main page
Click upload photo or choose from their photos

Add different smiley's to the face in your photo

Add hair , facial art and costumes

Play a little bit with the features of the face in your photo

Change race and gender

when you are done then share it or download it


Isn’t that quite cool and funny . Try it out with your students they will love it .
That’s it about Host-d.oddcast : Cartonize your Pictures into 3d Avatar.
You might also like :

Saturday, April 30, 2011

Images to Video : Convert Images into Videos

Images to Video is a cool application that allows you to convert jpg images to videos . It is one of the alternatives to Windows Movie Maker . What i liked about this tool is that it is very quick and does not take forever to convert items into videos . Try it out you might like it and therefore use it with your students to create awesome videos of a trip you made somewhere or turn a school party into a streaming video .


Some features of Images to Video

Here are the main services that Images to Video offers to its users
  • It is free
  • It is dead simple
  • It does not require any registration
  • It allows you to turn images into videos very easily
  • It supports many video formats like AVI (MPEG4), WMV, FLV (Flash), MOV (QuickTime).
  • It lets you integrate your video into your website or wiki

How can i get sarted using Images to Video ?

Head over to Images to Video main page
  1. Click on Add Images to upload your images
  2. Click on Add Sound to upload an audio clip
  3. Hit Generate video
It is this simple . Visit Images to Video and try it by yourself .
That’s it about Images to Video : Convert Images into Videos .

Tuesday, March 8, 2011

BeFunky : Create amazing classroom photos

BeFunky is a great web2.0 tool in education . It allows you to add photo effects to your images and customize them just in the way you like . students now can upload their photos and add effects to them then share them with their colleagues . You can try it as a fun activity to enhance student’s creativity and imagination .

befunky

Some features of BeFunk

BeFunky has many features like :
  • Give your digital creations a whole lot of character with BeFunky Goodies
  • It is free and does not need need registration
  • Photo editing made smart.
  • Fix your common photo problems like bad lighting, digital noise, fuzzy colors and details with one click.
  • Add speech bubbles, frames and more...
  • upload images  from anywhere online . Turn them into artwork and save back to your accounts on other websites.
  • Share your final artwork with your friends through email or social websites like facebook.

How can i get started using BeFunky ?

Log on to BeFunky main page and click on get started on the right hand

befunky2

Click on upload a photo or try a sample image .
befunky3
Here are the tools you can use to work on your photo or image :
Edit you photos

befunky4

Apply photo effects

befunky5

Apply artsy effects

befunky6

Apply graphics and shapes

befunky7
Add text , speech bubbles
befunky8

Add frame and borders
.
befunky9

After you finish you can print your photo or share it with others.
I hope you like this web 2.0 tool . I am sure your students will like . It is really a lot of fun .
You might also like :


  • 21st century search engines teachers need to be aware of


  • Bubblesnaps in education


  • Evernote :a new way to get organized in education


  • Springpad : teachers' free notes organizer web2.0 tool


  • A great functionality to improve twitter in education


  • Alphabetizer : organize students' writings


  • Web2.0 the machine is using us


  • The 21st century skills teachers should have


  • The 21st century pedagogy teachers should have


  • EmbedPlus :The educative way to use Youtube videos


  • Evernote :a new way to get organized in education


  • Springpad : teachers' free notes organizer web2.0 tool


  • A great functionality to improve twitter in education


  • Alphabetizer : organize students' writings


  • Web2.0 the machine is using us


  • The 21st century skills teachers should have
  • Wednesday, February 23, 2011

    Bubblesnaps in Education

    Bubblesnaps is one of my favorite web2.0 tool . It mixes fun and learning in such a healthy way that your students will love it so much . As you probably know , students have differing mentalities and psychological states , some learn by classical methods , others via cognitive ones ; some are slow learners and others are intelligent . But all these categories meet at one point : the use of fun activities in learning creates a student-friendly atmosphere and triggers active learning and motivation . Some of the web2.0 tools I am blogging about in this platform including this one under study now are just made for this purpose : Improve learning using technological tools .
    Bubblesnaps is about adding speech bubbles to a picture . Pictures can be uploaded from your computer or from your flickr account and attach it with your bubble captions before you either share it online or paste it to your site or blog .

    How can I get started using Bubblesnaps ?


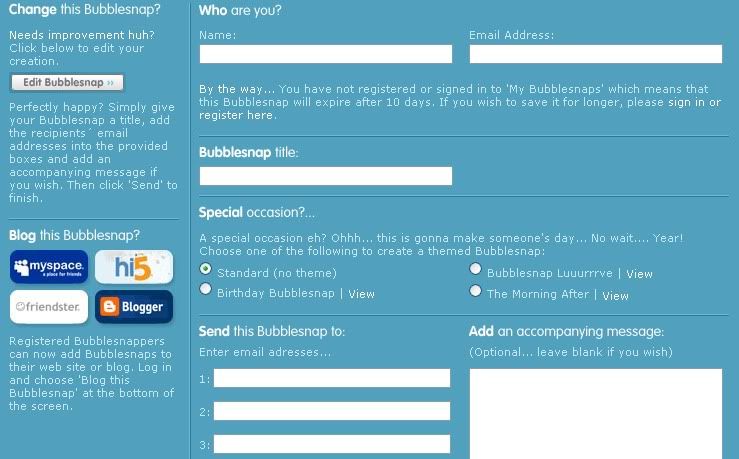
    First go to Bubblesnaps main page . You can dive right in to create your own bubblesnaps or register with them . If you do not register , your bubblesnaps will expire after 10 days .
    Now click on “ create your own” and select the emplacement of your picture .

    bublesnap

    You can either add , delete, speak, or think bubbles then click on finish .

    Bubblesnaps

    Bubblesnaps allows you to share your work with others in : Myspace, Hi5 , Friendstr, Blogger, Or
    send it via email .
    bubblesnaps

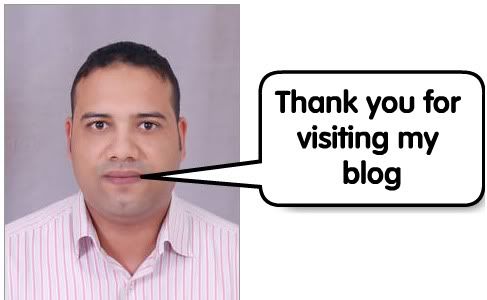
    Here is an example of a bubblesnap I have created :

    bubblesnaps


    Applications of Bubblesnaps in education

    This is for sure a very cool web2.0 tool that teachers and educators should try with their students . Just keep in mind that this is not a filtered site and I would not recommend that you let your students use it unsupervised . The following are some ideas of how you can apply Bubblesnaps in education :
    • Bubblesnaps can be used for vocabulary review with teachers providing pictures and students provide their equivalents
    • It can be used as a storytelling trigger . Teachers provide bubbles for pictures and students complete the narration line .
    • It can also be used to revise certain communicative functions, and grammatical structures.
    That’s it about Bubblesnaps in Education .

    You might also like :


  • Evernote :a new way to get organized in education


  • Springpad : teachers' free notes organizer web2.0 tool


  • A great functionality to improve twitter in education


  • Alphabetizer : organize students' writings


  • Web2.0 the machine is using us


  • The 21st century skills teachers should have


  • The 21st century pedagogy teachers should have


  • EmbedPlus :The educative way to use Youtube videos
  •